
Your Step-by-Step Guide to Painting and Stenciling Vintage Furniture
- America's Antique Mall

- May 29, 2023
- 5 min read
Updated: Dec 28, 2025
Do you have a piece of vintage furniture that you love, but it needs some TLC? Or maybe you have found an article of furniture for a great deal, but you don’t love the look of it. If either of these applies to you, then you should consider painting and stenciling furniture.
Painted or stenciled furniture is a great way to “zhuzh” up an old piece and give it new life. There are even people out there who turn selling their vintage, painted furniture into a lucrative business. But whether you’re looking to make a profit or simply create a pretty, fresh piece for your home, we’ll share our best tips and tricks to have you painting and stenciling furniture like a pro in no time.


Tools You’ll Need to Paint Vintage Furniture:
Screwdriver
Drop cloth
Palm sander
Sandpaper
Gloves
Dust mask
Cloths
Primer
Paint of your choice
Paintbrushes
Sealant
How to Paint Vintage Furniture

Before you begin your painted furniture project, find a piece of vintage furniture that is made of real wood. Make sure to gather all your necessary materials beforehand so you do not have to make a run to the hardware store mid-project. If you are making a stenciled furniture piece, you can follow these steps to first paint your foundation color before adding your stencil design.
7-Steps for Painting Furniture
Take off hardware
Sand it
Wipe it down
Apply primer
Paint it
Seal it
Reassemble
Remove Hardware and Drawers
To start your painted furniture project, you will first need to remove all the hardware and put it somewhere safe, such as a plastic baggie. Hardware includes any knobs, pulls, screws, and latches. If the piece includes any drawers, then remove those, as well.
Sanding Your Vintage Furniture is a Must
Set your piece and its drawers on a large drop cloth or tarp in order to keep paint from getting on the floor. Now comes the most tedious and time-consuming part — sanding. You will need to have 80-, 120-, and 220-grit sandpaper on hand (the lower the number of the grit, the rougher the sandpaper is). Wearing a proper dust mask, start with the lower grit sandpaper and work your way up to completely smooth out your piece.

When you are finished sanding your vintage furniture (which can take several hours, depending on its size), the wood grain should be visible, and the piece should feel soft and even. However, if the piece is in good condition and you are painting with a similar paint, you probably don’t need to sand it this extensively — just a light sanding will help the paint adhere.
Wipe Down the Furniture
To remove dirt, debris, and sawdust (there will be a lot after sanding), wipe down the article of furniture with a damp cloth or a special debris-catching “tack cloth,” which is available at hardware stores. You want to make sure the surface is completely smooth and clean before your next step so that the paint and primer can go on smoothly. If you are using a damp cloth, make sure to let the piece dry completely before painting the furniture.
Do I Need to Prime My Vintage Furniture Before Painting?
For the best results, you definitely want to add one to two coats of primer before painting. Although there are paints available with a built-in primer, using a separate primer will allow your paint to adhere better and can produce a more durable piece of painted furniture. After the second coat is dry, you should lightly sand it with 220-grit sandpaper to add a little bit of texture for the paint to cling to — just be sure to dust it again before painting it.
Painting the Vintage Furniture

Now for the fun part — finally painting your vintage furniture! Be sure to mix up your paint before you start the painting process. You can use any kind of brush, but you may want to have a variety of sizes at the ready (a good 2-inch brush is a great place to start). Start with one thin layer of paint and see how that looks.
If your painted furniture needs another coat, follow the instructions on how long to wait between coats (or make sure it is fully dry). Before you apply the second coat, again lightly sand your painted furniture with 220-grit sandpaper, clean off the debris, and then paint another coat (or even a third, if needed). Continue until your desired results are achieved.
Apply Sealant to the Freshly Painted Furniture
Adding a topcoat will help your painted furniture last longer and resist water damage and staining. Choose a sealant with the same finish as your paint type, such as wax-, oil-, or water-based. Another sealant option is polyurethane (you can choose oil or water-based, and matte, satin, or semi-gloss finishes), which is great for protecting and waterproofing.
If you are adding a polyurethane coat, make sure to follow safety precautions and work in a well-ventilated area.
Reassemble Your Fresh Vintage Furniture
Once all the pieces have fully dried, you can reassemble your vintage furniture and see your completed look! At this step, you could also replace the old hardware with something else to match the new look of your painted furniture. Just remember that even though the paint feels dry, it can take up to one or two weeks for the pain to fully cure — so be gentle with the piece until then.
How Do You Create Stenciled Furniture?
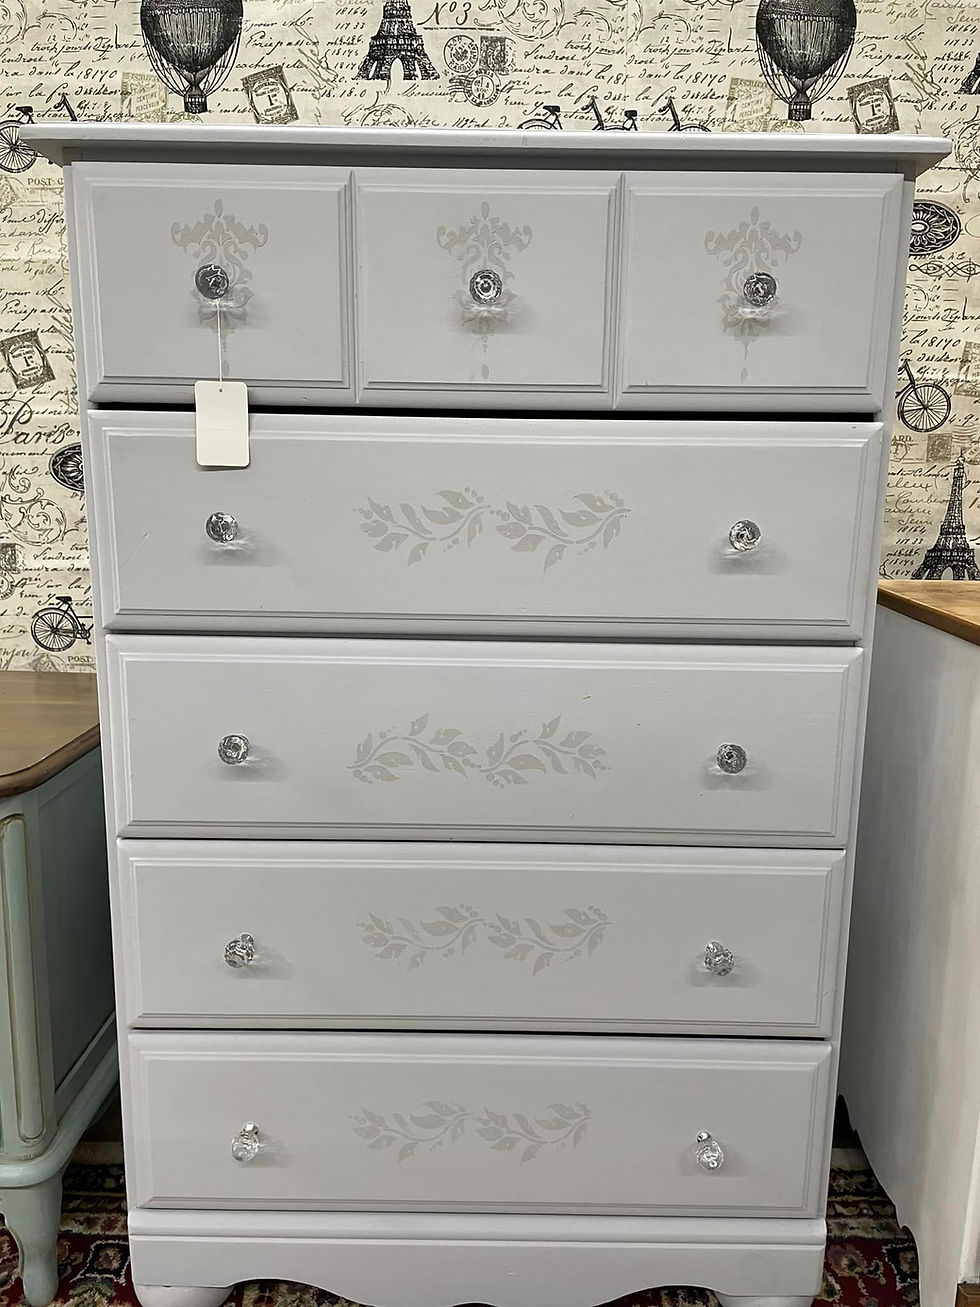
Now that you have painted furniture, you may want to take it a step further and add a stenciled design to your adorable piece of vintage furniture. Follow these easy steps, and you will be able to create your own unique piece of stenciled furniture.
What Supplies Are Needed for Making Stenciled Furniture?
Mini angled paintbrush
Sandpaper
Cloths
Stencil crush
Temporary adhesive spray or painter’s tape
Spray bottle
Paint of your choice
Stencil of your choice
Steps for Stenciling Furniture
First of all, plan out your design and map out where your stencils will be added. Clean your piece of vintage furniture and lightly sand the areas where you will apply the stencil. If your piece isn’t painted already, then apply your basecoat (see the instructions above for painting furniture).

Once your basecoat is fully dried, secure your stencil in place with temporary adhesive spray or painter’s tape. Use a brush or foam roller to paint your stencil design on the furniture. Be sure to remove excess paint from your brush before painting and to dab your brush on the stencil up and down (rather than side-to-side).
You may need two coats of paint to make your stenciled furniture design really pop. When you are done with one section, you will need to move and reposition your stencil to align with the pattern (it is best to wait until the paint is dry, so you don’t smudge your work). Once you are finished stenciling your furniture, add a protective topcoat to keep your hard work looking great.
Where Do You Find Vintage Furniture to Paint?
If you don’t already have an old piece of furniture ready for a project, then a great place to find one is an antique mall. America’s Antique Mall located in Melbourne, Florida, Algonquin, Illinois, and Highland, Indiana, offers a huge selection of antique and vintage furniture along with upcycled goods, collectibles, and more.
If you fall in love with painting and stenciling furniture, you may even want to turn it into a business! You can sell your painted furniture through online marketplaces or craft shows or even become a vendor at your local antique mall. With painted and stenciled furniture, your creative possibilities are endless — have fun making your own unique creations!


